111 Series Engine Vibration Damper/Pulley Installation Parts
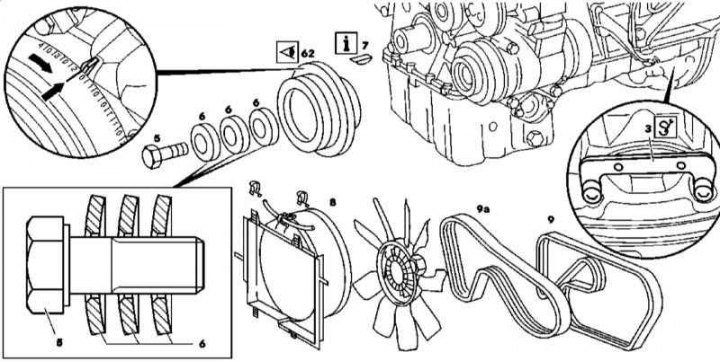
1. The installation details of the vibration damper/drive belt pulley of the 111 series engine are shown in the illustration, to which all references in the text refer.
2. Remove the viscous cooling fan assembly.
3. Remove fan shroud (8).
4. On models equipped with a suction fan, remove the fan assembly/electric A/C fan.
5. At the appropriate complete set remove a belt of a drive of the K/V compressor (9a).
6. Remove the accessory drive belt (9).
7. Having turned the crankshaft in the normal direction, bring the piston of the first cylinder to the TDC position - the crankshaft trunnion should turn around with a segment key (7) up.
8. Using a special tool (3) lock the flywheel/drive plate ring gear.
9. Turn out the central bolt (5) and remove it together with the cup washers (6).
10. Using a two-legged puller, remove the pulley/vibration damper assembly (62).
M112/113

Installation details of the vibration damper/drive belt pulley for 112 and 113 series engines and the crankshaft front oil seal (M113)
6 - Assembly sleeve (113 series engines)
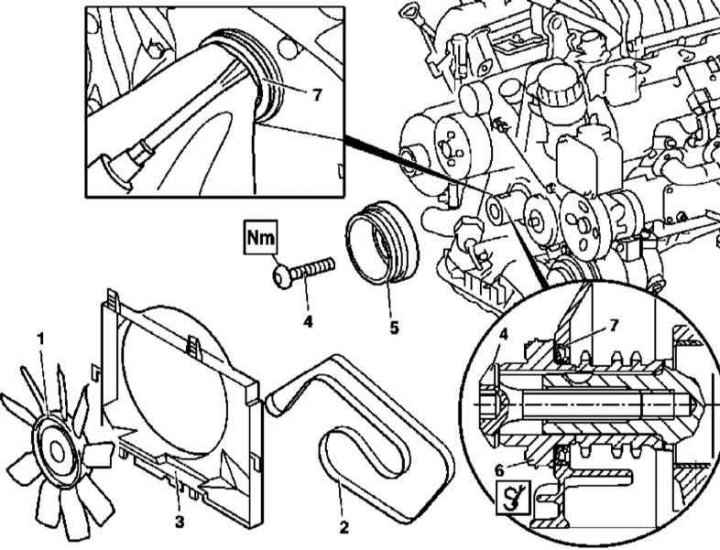
1. Parts for installing the vibration damper/drive belt pulley on 112 and 113 series engines and the front oil seal (113) shown in the illustration, which includes all references in the text.
2. Remove powertrain trim panels.
3. Remove the air baffle.
4. Remove the viscous fan assembly (1) and fan shroud (3).
5. Remove the accessory drive belt (2).
6. Locking the pulley by the teeth of the vibration damper, remove the central bolt (4).
7. Remove the pulley/vibration damper assembly (5).
8. On M113 engines, prying with a screwdriver, remove the front crankshaft oil seal (7), - take care not to damage the pulley seating surface.
9. Installation is carried out in the reverse order - when installing the stuffing box, use a suitable mandrel, do not use any sealants.
